全局配置文件
主体部分
# traefik.toml
################################################################
# 全局配置文件
################################################################

# 设置超时的时间(以秒为单位)
# 在热更新期间给还在活动中的请求来完成当前任务的超时时间
#
# 可选
# 默认: 10
#
# graceTimeOut = 10

# 开启调试模式
#
# 可选
# 默认: false
#
# debug = true

# 定期检查是否有新版本产生
#
# 可选
# 默认: true
#
# checkNewVersion = false

# Traefik 日志文件
# 如果没有定义, 日志文件输出到 stdout
#
# 可选
#
# traefikLogsFile = "log/traefik.log"

# 日志文件路径
#
# 可选
#
# accessLogsFile = "log/access.log"

# 日志等级
#
# 可选
# 默认: "ERROR"
# 接受以下值,按照严重程度排序: "DEBUG", "INFO", "WARN", "ERROR", "FATAL", "PANIC"
# 日志等级在配置值或配置值以上的信息将被日志记录。
#
# logLevel = "ERROR"

# 后端节流持续时间:在应用新配置之前,提供者的2个事件之间的最短持续时间(以秒为单位)
# 如果在短时间内发送多个事件,它可以避免不必要的重新加载。
#
# 可选
# 默认: "2"
#
# ProvidersThrottleDuration = "5"

# 为每个host控制最大空闲连接(keep-alive)。如果设置为0,那么将会使用
# Go语言基础库net/http中的DefaultMaxIdleConnsPerHost。
# 如果造成 'too many open files' 错误,你也可以增加这个值或改变 `ulimit`。
#
# 可选
# 默认: 200
#
# MaxIdleConnsPerHost = 200

# 如果设置为 true, 无效的 SSL 证书也会被后端所接受。If set to true invalid SSL certificates are accepted for backends.
# 注意:这会禁用中间人攻击(man-in-the-middle attacks)监测,所以只能被用在安全的后端网络中。
#
# 可选
# 默认: false
#
# InsecureSkipVerify = true

# 被前端所使用的入口点未指定任何入口点。
# 任何前端可以指定它自己的入口点。
#
# 可选
# 默认: ["http"]
#
# defaultEntryPoints = ["http", "https"]
约束
在一个以中央服务发现的微服务架构中,配置文件会将Træfɪk的发现范围约束到一小部分路由上。
Træfɪk 根据你在配置后端时为服务设置的属性/标签来过滤服务。
支持的后端类型:
- Docker
- Consul K/V
- BoltDB
- Zookeeper
- Etcd
- Consul Catalog
支持的过滤方式:
tag
# 定义约束条件
#
# 可选
#
# 简单约束匹配的条件
# constraints = ["tag==api"]
#
# 简单约束不匹配的条件
# constraints = ["tag!=api"]
#
# 约束全局匹配条件
# constraints = ["tag==us-*"]
#
# 后端指定约束条件
# [consulCatalog]
#   endpoint = 127.0.0.1:8500
#   constraints = ["tag==api"]
#
# 多个约束条件
#   - "tag==" 必需匹配至少一个标签
#   - "tag!=" 必需不匹配任何标签
# constraints = ["tag!=us-*", "tag!=asia-*"]
# [consulCatalog]
#   endpoint = 127.0.0.1:8500
#   constraints = ["tag==api", "tag!=v*-beta"]
入口点定义
# 入口点定义
#
# 可选
# 默认:
# [entryPoints]
#   [entryPoints.http]
#   address = ":80"
#
# 将一个http入口点转发到一个https入口点上(保留 SNI 支持):
# [entryPoints]
#   [entryPoints.http]
#   address = ":80"
#     [entryPoints.http.redirect]
#       entryPoint = "https"
#   [entryPoints.https]
#   address = ":443"
#     [entryPoints.https.tls]
#       [[entryPoints.https.tls.certificates]]
#       CertFile = "integration/fixtures/https/snitest.com.cert"
#       KeyFile = "integration/fixtures/https/snitest.com.key"
#       [[entryPoints.https.tls.certificates]]
#       CertFile = "integration/fixtures/https/snitest.org.cert"
#       KeyFile = "integration/fixtures/https/snitest.org.key"
#
# 将一个入口点转发重写为URL:
# [entryPoints]
#   [entryPoints.http]
#   address = ":80"
#     [entryPoints.http.redirect]
#       regex = "^http://localhost/(.*)"
#       replacement = "http://mydomain/$1"
#
# 只接受提供了被指定证书认证机构(CA)签发的证书的客户端。
# ClientCAFiles 可以在同一个文件被配置为多个CA证书或使用一个或多个文件配置多个CA证书。
# CA证书必需是PEM文件格式的。
# 所有客户端将被要求提供一个有效的证书。
# 这个队客户端的要求会被应用到该入口点下的所有服务器证书
# 在下面的例子中 snitest.com 与 snitest.org 都需要提供客户端证书
#
# [entryPoints]
#   [entryPoints.https]
#   address = ":443"
#   [entryPoints.https.tls]
#   ClientCAFiles = ["tests/clientca1.crt", "tests/clientca2.crt"]
#     [[entryPoints.https.tls.certificates]]
#     CertFile = "integration/fixtures/https/snitest.com.cert"
#     KeyFile = "integration/fixtures/https/snitest.com.key"
#     [[entryPoints.https.tls.certificates]]
#     CertFile = "integration/fixtures/https/snitest.org.cert"
#     KeyFile = "integration/fixtures/https/snitest.org.key"
#
# 要为一个入口点开启基础认证(basic auth)
# 使用2组用户名/密码: test:test 与 test2:test2
# 密码可以以MD5、SHA1或BCrypt方式加密:你可以使用htpasswd来生成这些用户名密码。
# [entryPoints]
#   [entryPoints.http]
#   address = ":80"
#   [entryPoints.http.auth.basic]
#   users = ["test:$apr1$H6uskkkW$IgXLP6ewTrSuBkTrqE8wj/", "test2:$apr1$d9hr9HBB$4HxwgUir3HP4EsggP/QNo0"]
#
# 要为一个入口点开启摘要认证(digest auth)
# 使用2组用户名/域/密码: test:traefik:test 与 test2:traefik:test2
# 你可以使用htdigest来生成这些用户名/域/密码
# [entryPoints]
#   [entryPoints.http]
#   address = ":80"
#   [entryPoints.http.auth.basic]
#   users = ["test:traefik:a2688e031edb4be6a3797f3882655c05 ", "test2:traefik:518845800f9e2bfb1f1f740ec24f074e"]
#
# 要指定一个https入口点使用一个较低的TLS版本并且指定一组密钥(在crypto/tls包中定义):
# [entryPoints]
#   [entryPoints.https]
#   address = ":443"
#     [entryPoints.https.tls]
#     MinVersion = "VersionTLS12"
#     CipherSuites = ["TLS_RSA_WITH_AES_256_GCM_SHA384"]
#       [[entryPoints.https.tls.certificates]]
#       CertFile = "integration/fixtures/https/snitest.com.cert"
#       KeyFile = "integration/fixtures/https/snitest.com.key"
#       [[entryPoints.https.tls.certificates]]
#       CertFile = "integration/fixtures/https/snitest.org.cert"
#       KeyFile = "integration/fixtures/https/snitest.org.key"

# 要启用gzip格式压缩支持:
# [entryPoints]
#   [entryPoints.http]
#   address = ":80"
#   compress = true

[entryPoints]
  [entryPoints.http]
  address = ":80"
重试配置
# 当网络故障时启用重发请求
#
# 可选
#
[retry]

# 重试次数
#
# 可选
# 默认: (后端服务器数量) -1
#
# attempts = 3
ACME (Let's Encrypt) 配置
# 使用ACME的入口点配置样本
[entryPoints]
[entryPoints.https]
address = ":443"
[entryPoints.https.tls]
# 启用 ACME (Let's Encrypt): 自动 SSL
#
# 可选
#
[acme]
# 用于注册的邮箱地址
#
# 必需
#
email = "[email protected]"
# 证书存储使用的文件或键。
# 警告,如果你在Docker中使用Traefik你有两种选择:
# - 在你的服务器上创建一个文件并作为一个卷挂载
# storageFile = "acme.json"
# $ docker run -v "/my/host/acme.json:acme.json" traefik
# - 将包含这个文件的目录作为一个卷挂载
# storageFile = "/etc/traefik/acme/acme.json"
# $ docker run -v "/my/host/acme:/etc/traefik/acme" traefik
#
# 必需
#
storage = "acme.json" # or "traefik/acme/account" if using KV store
# 代理acme验证证书challenge/apply的入口点。
# 警告, 必需指向到一个443端口作为入口点
#
# 必需
#
entryPoint = "https"
# 使用一个基于DNS的acme challenge而不是使用额外的HTTPS接入,例如,一个带有前置防火墙的服务器的情况可能无法完成验证
# 选择一个可以设置 challenge TXT 匹配记录的DNS域名的提供者,
# 并提供以下环境变量来启用它:
# - cloudflare: CLOUDFLARE_EMAIL, CLOUDFLARE_API_KEY
# - digitalocean: DO_AUTH_TOKEN
# - dnsimple: DNSIMPLE_EMAIL, DNSIMPLE_API_KEY
# - dnsmadeeasy: DNSMADEEASY_API_KEY, DNSMADEEASY_API_SECRET
# - exoscale: EXOSCALE_API_KEY, EXOSCALE_API_SECRET
# - gandi: GANDI_API_KEY
# - linode: LINODE_API_KEY
# - manual: 无,但是需要以可交互模式运行traefik & 打开acmeLogging来查看说明 & 按下回车
# - namecheap: NAMECHEAP_API_USER, NAMECHEAP_API_KEY
# - rfc2136: RFC2136_TSIG_KEY, RFC2136_TSIG_SECRET, RFC2136_TSIG_ALGORITHM, RFC2136_NAMESERVER
# - route53: AWS_ACCESS_KEY_ID, AWS_SECRET_ACCESS_KEY, AWS_REGION, or configured user/instance IAM profile
# - dyn: DYN_CUSTOMER_NAME, DYN_USER_NAME, DYN_PASSWORD
# - vultr: VULTR_API_KEY
# - ovh: OVH_ENDPOINT, OVH_APPLICATION_KEY, OVH_APPLICATION_SECRET, OVH_CONSUMER_KEY
# - pdns: PDNS_API_KEY, PDNS_API_URL
#
# 可选
#
# dnsProvider = "digitalocean"
# 默认情况下,DNS提供者会在ACME验证前验证TXT DNS challenge
# 如果 delayDontCheckDNS 是一个比0大的值,跳过这里 & 否则配置这里就是等待多长时间(以秒为单位)
# 当内网屏蔽了附加的DNS查询时非常有用
#
# Optional
#
# delayDontCheckDNS = 0
# 如果设置为true,将显示由acme客户端代码库中产生的调试日志信息
#
# 可选
#
# acmeLogging = true
# 启用按需证书。如果这个主机名还没有证书,这将会在与一个主机名发起请求的第一个TLS握手中向Let's Encrypt请求一个证书。
# 警告,第一次在请求中获取主机证书会导致TLS握手会非常慢,这会引起Dos攻击。
# 警告,值得注意的是Let's Encrypt是有请求上限的:https://letsencrypt.org/docs/rate-limits
#
# 可选
#
# onDemand = true
# 启用根据前端Host规则来生成证书。这将会为每个具有Host规则的前端生成一个Let's Encrypt的证书。
# 举个例子,一个具有规则的Host:test1.traefik.cn,test2.traefik.cn 将会为主域名test1.traefik.cn与SAN(替代域名) test2.traefik.cn生成一个证书。
#
# 可选
#
# OnHostRule = true
# 所使用的CA服务器
# 取消注释这行来使其运行在正式环境的Let's Encrypt证书服务器上
# 在生产环境中请取消注释
#
# 可选
#
# caServer = "https://acme-staging.api.letsencrypt.org/directory"
# 域名列表
# 你可以为每个主域名提供多个SANs(替代域名)
# 所有域名的A/AAAA记录必需指向 Traefik
# 警告,值得注意的是Let's Encrypt是有请求上限的:https://letsencrypt.org/docs/rate-limits
# 每个域名 & SANs(替代域名)都将会指向一个证书请求。
#
# [[acme.domains]]
# main = "local1.com"
# sans = ["test1.local1.com", "test2.local1.com"]
# [[acme.domains]]
# main = "local2.com"
# sans = ["test1.local2.com", "test2x.local2.com"]
# [[acme.domains]]
# main = "local3.com"
# [[acme.domains]]
# main = "local4.com"
[[acme.domains]]
main = "local1.com"
sans = ["test1.local1.com", "test2.local1.com"]
[[acme.domains]]
main = "local3.com"
[[acme.domains]]
main = "local4.com"
配置后端
文件后端
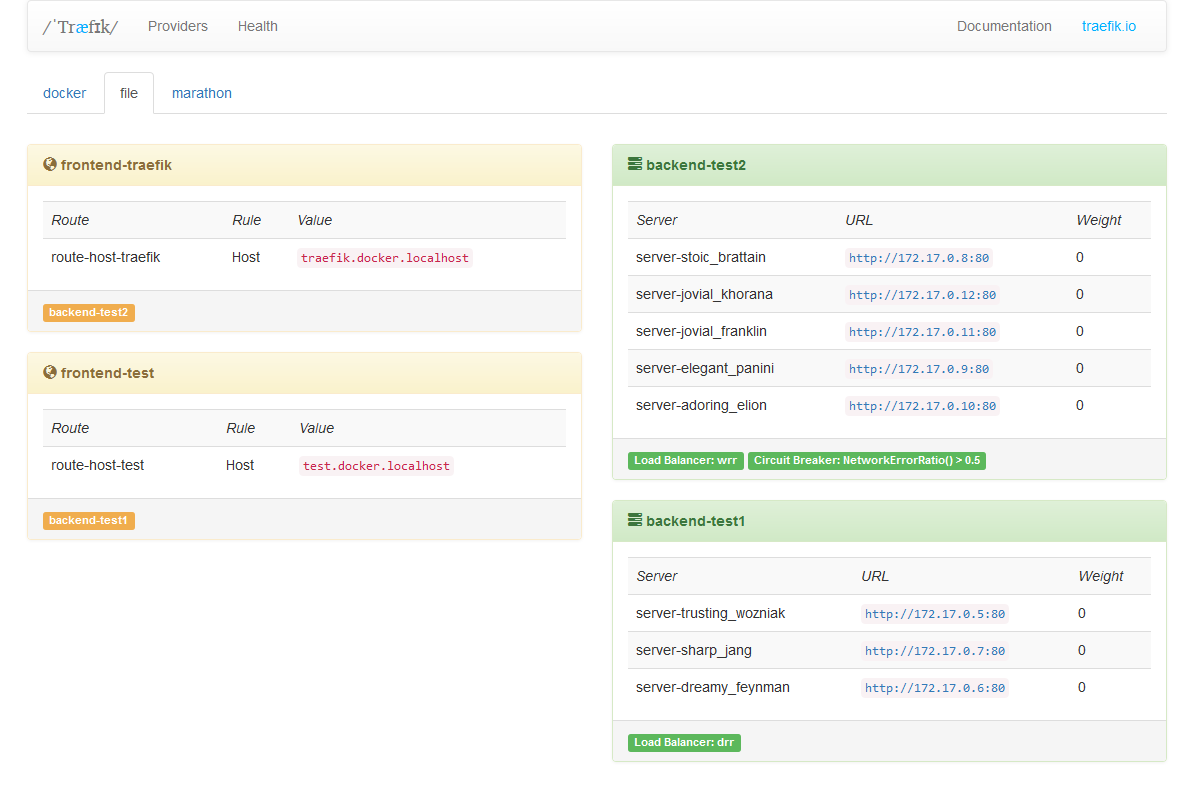
类似其他的反向代理工具,Træfɪk也可以使用文件来配置。你有两种选择:
- 在全局配置文件
traefik.toml后追加你的配置:
# traefik.toml
logLevel = "DEBUG"
defaultEntryPoints = ["http", "https"]
[entryPoints]
  [entryPoints.http]
  address = ":80"
    [entryPoints.http.redirect]
      entryPoint = "https"
  [entryPoints.https]
  address = ":443"
    [entryPoints.https.tls]
      [[entryPoints.https.tls.certificates]]
      CertFile = "integration/fixtures/https/snitest.com.cert"
      KeyFile = "integration/fixtures/https/snitest.com.key"
      [[entryPoints.https.tls.certificates]]
      CertFile = "integration/fixtures/https/snitest.org.cert"
      KeyFile = "integration/fixtures/https/snitest.org.key"

[file]

# rules
[backends]
  [backends.backend1]
    [backends.backend1.circuitbreaker]
      expression = "NetworkErrorRatio() > 0.5"
    [backends.backend1.servers.server1]
    url = "http://172.17.0.2:80"
    weight = 10
    [backends.backend1.servers.server2]
    url = "http://172.17.0.3:80"
    weight = 1
  [backends.backend2]
    [backends.backend1.maxconn]
      amount = 10
      extractorfunc = "request.host"
    [backends.backend2.LoadBalancer]
      method = "drr"
    [backends.backend2.servers.server1]
    url = "http://172.17.0.4:80"
    weight = 1
    [backends.backend2.servers.server2]
    url = "http://172.17.0.5:80"
    weight = 2

[frontends]
  [frontends.frontend1]
  backend = "backend2"
    [frontends.frontend1.routes.test_1]
    rule = "Host:test.localhost"
  [frontends.frontend2]
  backend = "backend1"
  passHostHeader = true
  priority = 10
  entrypoints = ["https"] # 覆盖 defaultEntryPoints
    [frontends.frontend2.routes.test_1]
    rule = "Host:{subdomain:[a-z]+}.localhost"
  [frontends.frontend3]
  entrypoints = ["http", "https"] # 覆盖 defaultEntryPoints
  backend = "backend2"
    rule = "Path:/test"
- 或者将你的规则分割成独立的文件,例如
rules.toml:
# traefik.toml
logLevel = "DEBUG"
[entryPoints]
  [entryPoints.http]
  address = ":80"
    [entryPoints.http.redirect]
      entryPoint = "https"
  [entryPoints.https]
  address = ":443"
    [entryPoints.https.tls]
      [[entryPoints.https.tls.certificates]]
      CertFile = "integration/fixtures/https/snitest.com.cert"
      KeyFile = "integration/fixtures/https/snitest.com.key"
      [[entryPoints.https.tls.certificates]]
      CertFile = "integration/fixtures/https/snitest.org.cert"
      KeyFile = "integration/fixtures/https/snitest.org.key"

[file]
filename = "rules.toml"
# rules.toml
[backends]
  [backends.backend1]
    [backends.backend1.circuitbreaker]
      expression = "NetworkErrorRatio() > 0.5"
    [backends.backend1.servers.server1]
    url = "http://172.17.0.2:80"
    weight = 10
    [backends.backend1.servers.server2]
    url = "http://172.17.0.3:80"
    weight = 1
  [backends.backend2]
    [backends.backend1.maxconn]
      amount = 10
      extractorfunc = "request.host"
    [backends.backend2.LoadBalancer]
      method = "drr"
    [backends.backend2.servers.server1]
    url = "http://172.17.0.4:80"
    weight = 1
    [backends.backend2.servers.server2]
    url = "http://172.17.0.5:80"
    weight = 2

[frontends]
  [frontends.frontend1]
  backend = "backend2"
    [frontends.frontend1.routes.test_1]
    rule = "Host:test.localhost"
  [frontends.frontend2]
  backend = "backend1"
  passHostHeader = true
  priority = 10
  entrypoints = ["https"] # overrides defaultEntryPoints
    [frontends.frontend2.routes.test_1]
    rule = "Host:{subdomain:[a-z]+}.localhost"
  [frontends.frontend3]
  entrypoints = ["http", "https"] # overrides defaultEntryPoints
  backend = "backend2"
    rule = "Path:/test"
如果你希望 Træfɪk 动态监测这些文件的变化,只需添加:
[file]
watch = true
API 后端
Træfik 可以通过 RESTful api 进行配置. 想要开启它:
[web]
address = ":8080"

# SSL 证书与密钥文件配置
#
# 可选
#
# CertFile = "traefik.crt"
# KeyFile = "traefik.key"
#
# 将REST API设置为只读模式
#
# 可选
# ReadOnly = false
#
# 开启更多详细统计信息
# [web.statistics]
#   RecentErrors = 10
#
# 为Traefik启用向Prometheus提供内部维度
# [web.metrics.prometheus]
#   Buckets=[0.1,0.3,1.2,5]
#
# 在WebUI中启用基础认证(basic auth)
# 使用2组用户名/密码: test:test 与 test2:test2
# 密码可以以MD5、SHA1或BCrypt方式加密:你可以使用htpasswd来生成这些用户名密码。
#   [web.auth.basic]
#     users = ["test:$apr1$H6uskkkW$IgXLP6ewTrSuBkTrqE8wj/", "test2:$apr1$d9hr9HBB$4HxwgUir3HP4EsggP/QNo0"]
# 为WebUI开启摘要认证(digest auth)
# 使用2组用户名/域/密码: test:traefik:test 与 test2:traefik:test2
# 你可以使用htdigest来生成这些用户名/域/密码
#   [web.auth.digest]
#     users = ["test:traefik:a2688e031edb4be6a3797f3882655c05 ", "test2:traefik:518845800f9e2bfb1f1f740ec24f074e"]
/: 为Træfik提供一个简单的HTML前端页面
/ping:GET为Træfik提供一个简单的查看进程活跃度的查询端口。
$ curl -sv "http://localhost:8080/ping"
*   Trying ::1...
* Connected to localhost (::1) port 8080 (#0)
> GET /ping HTTP/1.1
> Host: localhost:8080
> User-Agent: curl/7.43.0
> Accept: */*
>
< HTTP/1.1 200 OK
< Date: Thu, 25 Aug 2016 01:35:36 GMT
< Content-Length: 2
< Content-Type: text/plain; charset=utf-8
<
* Connection #0 to host localhost left intact
OK
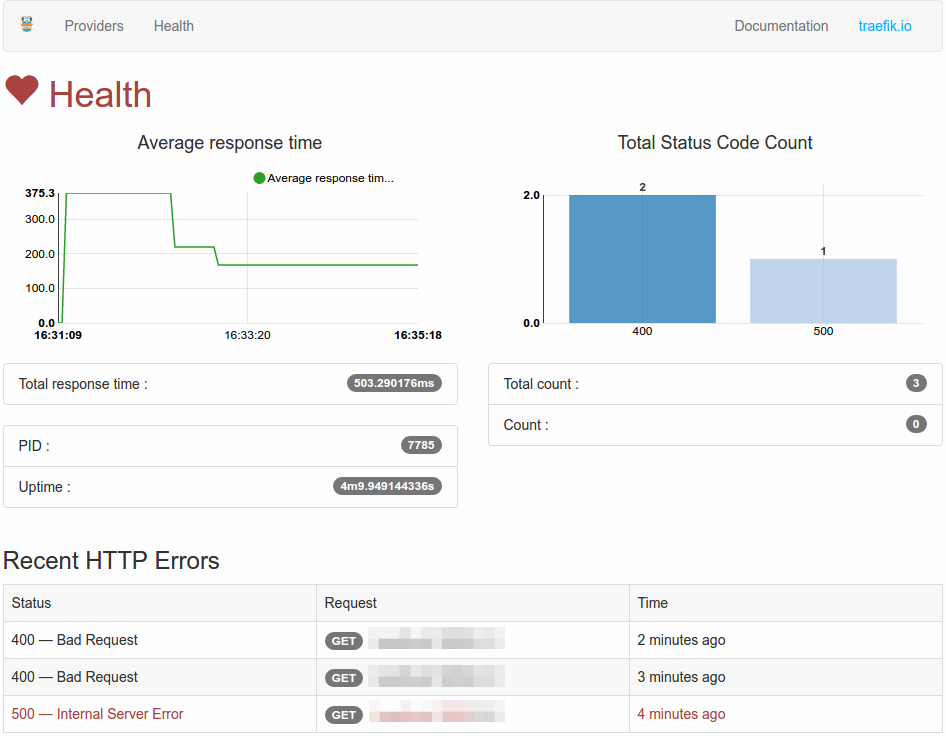
/health:GETjson metrics
$ curl -s "http://localhost:8080/health" | jq .
{
  // Træfɪk 进程ID(PID)
  "pid": 2458,
  // Træfɪk 服务器运行时间(格式化的时间)
  "uptime": "39m6.885931127s",
  //  Træfɪk 服务器运行时间(以秒为单位)
  "uptime_sec": 2346.885931127,
  // 当前服务器日期
  "time": "2015-10-07 18:32:24.362238909 +0200 CEST",
  // 当前服务器时间(以秒为单位)
  "unixtime": 1444235544,
  // HTTP请求返回状态码实时统计
  "status_code_count": {
    "502": 1
  },
  // HTTP请求返回状态码实时统计(自Træfɪk启动以来)
  "total_status_code_count": {
    "200": 7,
    "404": 21,
    "502": 13
  },
  // 统计HTTP请求
  "count": 1,
  // 统计HTTP请求总数
  "total_count": 41,
  // 统计所有响应时间之和(格式化的时间)
  "total_response_time": "35.456865605s",
  // 统计所有响应时间之和(以秒为单位)
  "total_response_time_sec": 35.456865605,
  // 平均响应时间(格式化的时间)
  "average_response_time": "864.8016ms",
  // 平均响应时间(以秒为单位)
  "average_response_time_sec": 0.8648016000000001,

  // 请求统计 [需要设置 --web.statistics ]
  // 近10个响应状态码为 4xx 与 5xx 的请求
  "recent_errors": [
    {
      // 状态码
      "status_code": 500,
      // 状态码秒数
      "status": "Internal Server Error",
      // HTTP请求方法
      "method": "GET",
      // 请求域名
      "host": "localhost",
      // 请求路径
      "path": "/path",
      // RFC 3339 格式化的 日期/时间
      "time": "2016-10-21T16:59:15.418495872-07:00"
    }
  ]
}
/api:GET所有提供者的配置文件
$ curl -s "http://localhost:8080/api" | jq .
{
  "file": {
    "frontends": {
      "frontend2": {
        "routes": {
          "test_2": {
            "rule": "Path:/test"
          }
        },
        "backend": "backend1"
      },
      "frontend1": {
        "routes": {
          "test_1": {
            "rule": "Host:test.localhost"
          }
        },
        "backend": "backend2"
      }
    },
    "backends": {
      "backend2": {
        "loadBalancer": {
          "method": "drr"
        },
        "servers": {
          "server2": {
            "weight": 2,
            "URL": "http://172.17.0.5:80"
          },
          "server1": {
            "weight": 1,
            "url": "http://172.17.0.4:80"
          }
        }
      },
      "backend1": {
        "loadBalancer": {
          "method": "wrr"
        },
        "circuitBreaker": {
          "expression": "NetworkErrorRatio() > 0.5"
        },
        "servers": {
          "server2": {
            "weight": 1,
            "url": "http://172.17.0.3:80"
          },
          "server1": {
            "weight": 10,
            "url": "http://172.17.0.2:80"
          }
        }
      }
    }
  }
}
/api/providers:GET提供者/api/providers/{provider}:GETorPUT提供者/api/providers/{provider}/backends:GET后端列表/api/providers/{provider}/backends/{backend}:GET一个后端/api/providers/{provider}/backends/{backend}/servers:GET后端的服务器列表/api/providers/{provider}/backends/{backend}/servers/{server}:GET后端的一个服务器/api/providers/{provider}/frontends:GET前端列表/api/providers/{provider}/frontends/{frontend}:GET一个前端/api/providers/{provider}/frontends/{frontend}/routes:GET前端的路由列表-
/api/providers/{provider}/frontends/{frontend}/routes/{route}:GET前端的一个路由 -
/metrics: 你可以为Traefik开启向其他不同的监控系统输出的内部维度(当前只支持Prometheus)。
$ traefik --web.metrics.prometheus --web.metrics.prometheus.buckets="0.1,0.3,1.2,5"
Docker 后端
Træfɪk可以使用Docker作为后端配置:
################################################################
# Docker 后端配置
################################################################

# 启用Docker后端配置
#
# 可选
#
[docker]

# Docker服务器端口。可以是一个TCP或者一个unix socket端口。
#
# 必需
#
endpoint = "unix:///var/run/docker.sock"

# 使用默认域名。
# 可以通过为容器设置"traefik.domain" label来覆盖。
#
# 必需
#
domain = "docker.localhost"

# 启用监控docker变化
#
# 可选
#
watch = true

# 覆盖默认配置文件模版。为高级用户:)
#
# 可选
#
# filename = "docker.tmpl"

# 默认将容器暴露给traefik
# 如果设置为false,没有设置`traefik.enable=true`的容器将被忽略
#
# 可选
# 默认: true
#
exposedbydefault = true

# 使用绑定端口的IP地址而不是使用内部网络。为了特殊使用场景:)

#
# 可选
# 默认: false
#
usebindportip = true
# 使用 Swarm Mode 服务作为数据提供者
#
# 可选
# 默认: false
#
swarmmode = false


# 启用docker TLS连接
#
#  [docker.tls]
#  ca = "/etc/ssl/ca.crt"
#  cert = "/etc/ssl/docker.crt"
#  key = "/etc/ssl/docker.key"
#  insecureskipverify = true
可以给容器用来覆盖默认表现方式的Label:
traefik.backend=foo: 将容器指向foo后端traefik.backend.maxconn.amount=10: 设置后端连接的最大数量。必需与以下label配合使用才能生效。traefik.backend.maxconn.extractorfunc=client.ip: 设置后端连接最大数量所依赖的维度。必需与上面的label配合使用才能生效。traefik.backend.loadbalancer.method=drr: 覆盖默认的wrr负载均衡算法逻辑traefik.backend.loadbalancer.sticky=true: 启用后端粘滞sessiontraefik.backend.loadbalancer.swarm=true: 使用 Swarm 内置的负载均衡器(只有使用Swarm Mode时生效)。traefik.backend.circuitbreaker.expression=NetworkErrorRatio() > 0.5: 为后端创建一个 断路器 。traefik.port=80: 注册使用这个端口。当容器暴露出多个端口时非常有效。traefik.protocol=https: 覆盖默认的http协议traefik.weight=10: 为容器指定权重traefik.enable=false: 为Træfɪk禁用这个容器traefik.frontend.rule=Host:test.traefik.io: 覆盖默认前端规则(默认:Host:{containerName}.{domain})。traefik.frontend.passHostHeader=true: 将客户端header中的Host转发到后端。traefik.frontend.priority=10: 覆盖默认的前端优先级traefik.frontend.entryPoints=http,https: 将这个前端指向入口点http与https。 覆盖defaultEntryPoints。traefik.docker.network: 设置连接到这个容器的docker网络。 如果容易被链接到多个网络,一定要设置合适的网络名称(你可以使用docker检查<container_id>)否则它将自动选择一个(取决于docker如何返回它们)。例如,当通过compose文件部署dockerstack,compose定义的网络名将以stack为前缀。
NB: 当运行在一个容器中时,Træfɪk需要网络访问权限以运行 docker network connect <network> <traefik-container>
Marathon 后端
Træfɪk 可以使用Marathon作为后端配置:
################################################################
# Mesos/Marathon 后端配置
################################################################

# 启用 Marathon 后端配置
#
# Optional
#
[marathon]

# Marathon server endpoint.
# You can also specify multiple endpoint for Marathon:
# endpoint := "http://10.241.1.71:8080,10.241.1.72:8080,10.241.1.73:8080"
#
# Required
#
endpoint = "http://127.0.0.1:8080"

# Enable watch Marathon changes
#
# Optional
#
watch = true

# Default domain used.
#
# Required
#
domain = "marathon.localhost"

# Override default configuration template. For advanced users :)
#
# Optional
#
# filename = "marathon.tmpl"

# Expose Marathon apps by default in traefik
#
# Optional
# Default: true
#
# exposedByDefault = true

# Convert Marathon groups to subdomains
# Default behavior: /foo/bar/myapp => foo-bar-myapp.{defaultDomain}
# with groupsAsSubDomains enabled: /foo/bar/myapp => myapp.bar.foo.{defaultDomain}
#
# Optional
# Default: false
#
# groupsAsSubDomains = true

# Enable compatibility with marathon-lb labels
#
# Optional
# Default: false
#
# marathonLBCompatibility = true

# Enable Marathon basic authentication
#
# Optional
#
#  [marathon.basic]
#  httpBasicAuthUser = "foo"
#  httpBasicPassword = "bar"

# TLS client configuration. https://golang.org/pkg/crypto/tls/#Config
#
# Optional
#
# [marathon.TLS]
# CA = "/etc/ssl/ca.crt"
# Cert = "/etc/ssl/marathon.cert"
# Key = "/etc/ssl/marathon.key"
# InsecureSkipVerify = true

# DCOSToken for DCOS environment, This will override the Authorization header
#
# Optional
#
# dcosToken = "xxxxxx"

# Override DialerTimeout
# Amount of time in seconds to allow the Marathon provider to wait to open a TCP
# connection to a Marathon master
#
# Optional
# Default: 60
# dialerTimeout = 5

# Set the TCP Keep Alive interval (in seconds) for the Marathon HTTP Client
#
# Optional
# Default: 10
#
# keepAlive = 10
Labels can be used on containers to override default behaviour:
traefik.backend=foo: assign the application tofoobackendtraefik.backend.maxconn.amount=10: set a maximum number of connections to the backend. Must be used in conjunction with the below label to take effect.traefik.backend.maxconn.extractorfunc=client.ip: set the function to be used against the request to determine what to limit maximum connections to the backend by. Must be used in conjunction with the above label to take effect.traefik.backend.loadbalancer.method=drr: override the defaultwrrload balancer algorithmtraefik.backend.loadbalancer.sticky=true: enable backend sticky sessionstraefik.backend.circuitbreaker.expression=NetworkErrorRatio() > 0.5: create a circuit breaker to be used against the backendtraefik.portIndex=1: register port by index in the application's ports array. Useful when the application exposes multiple ports.traefik.port=80: register the explicit application port value. Cannot be used alongsidetraefik.portIndex.traefik.protocol=https: override the defaulthttpprotocoltraefik.weight=10: assign this weight to the applicationtraefik.enable=false: disable this application in Træfɪktraefik.frontend.rule=Host:test.traefik.io: override the default frontend rule (Default:Host:{containerName}.{domain}).traefik.frontend.passHostHeader=true: forward clientHostheader to the backend.traefik.frontend.priority=10: override default frontend prioritytraefik.frontend.entryPoints=http,https: assign this frontend to entry pointshttpandhttps. OverridesdefaultEntryPoints.
Mesos generic backend
Træfɪk can be configured to use Mesos as a backend configuration:
################################################################
# Mesos configuration backend
################################################################

# Enable Mesos configuration backend
#
# Optional
#
[mesos]

# Mesos server endpoint.
# You can also specify multiple endpoint for Mesos:
# endpoint = "192.168.35.40:5050,192.168.35.41:5050,192.168.35.42:5050"
# endpoint = "zk://192.168.35.20:2181,192.168.35.21:2181,192.168.35.22:2181/mesos"
#
# Required
#
endpoint = "http://127.0.0.1:8080"

# Enable watch Mesos changes
#
# Optional
#
watch = true

# Default domain used.
# Can be overridden by setting the "traefik.domain" label on an application.
#
# Required
#
domain = "mesos.localhost"

# Override default configuration template. For advanced users :)
#
# Optional
#
# filename = "mesos.tmpl"

# Expose Mesos apps by default in traefik
#
# Optional
# Default: false
#
# ExposedByDefault = true

# TLS client configuration. https://golang.org/pkg/crypto/tls/#Config
#
# Optional
#
# [mesos.TLS]
# InsecureSkipVerify = true

# Zookeeper timeout (in seconds)
#
# Optional
# Default: 30
#
# ZkDetectionTimeout = 30

# Polling interval (in seconds)
#
# Optional
# Default: 30
#
# RefreshSeconds = 30

# IP sources (e.g. host, docker, mesos, rkt)
#
# Optional
#
# IPSources = "host"

# HTTP Timeout (in seconds)
#
# Optional
# Default: 30
#
# StateTimeoutSecond = "30"
Kubernetes Ingress backend
Træfɪk can be configured to use Kubernetes Ingress as a backend configuration:
################################################################
# Kubernetes Ingress configuration backend
################################################################
# Enable Kubernetes Ingress configuration backend
#
# Optional
#
[kubernetes]

# Kubernetes server endpoint
#
# When deployed as a replication controller in Kubernetes,
# Traefik will use env variable KUBERNETES_SERVICE_HOST
# and KUBERNETES_SERVICE_PORT_HTTPS as endpoint
# Secure token will be found in /var/run/secrets/kubernetes.io/serviceaccount/token
# and SSL CA cert in /var/run/secrets/kubernetes.io/serviceaccount/ca.crt
#
# Optional
#
# endpoint = "http://localhost:8080"
# namespaces = ["default","production"]
#
# See: http://kubernetes.io/docs/user-guide/labels/#list-and-watch-filtering
# labelselector = "A and not B"
#
Annotations can be used on containers to override default behaviour for the whole Ingress resource:
traefik.frontend.rule.type: PathPrefixStrip: override the default frontend rule type (Default:PathPrefix).
Annotations can be used on the Kubernetes service to override default behaviour:
traefik.backend.loadbalancer.method=drr: override the defaultwrrload balancer algorithmtraefik.backend.loadbalancer.sticky=true: enable backend sticky sessions
You can find here an example ingress and replication controller.
Additionally, an annotation can be used on Kubernetes services to set the circuit breaker expression for a backend.
traefik.backend.circuitbreaker: <expression>: set the circuit breaker expression for the backend (Default: nil).
Consul backend
Træfɪk can be configured to use Consul as a backend configuration:
################################################################
# Consul KV configuration backend
################################################################

# Enable Consul KV configuration backend
#
# Optional
#
[consul]

# Consul server endpoint
#
# Required
#
endpoint = "127.0.0.1:8500"

# Enable watch Consul changes
#
# Optional
#
watch = true

# Prefix used for KV store.
#
# Optional
#
prefix = "traefik"

# Override default configuration template. For advanced users :)
#
# Optional
#
# filename = "consul.tmpl"

# Enable consul TLS connection
#
# Optional
#
# [consul.tls]
# ca = "/etc/ssl/ca.crt"
# cert = "/etc/ssl/consul.crt"
# key = "/etc/ssl/consul.key"
# insecureskipverify = true
Please refer to the Key Value storage structure section to get documentation on traefik KV structure.
Consul catalog backend
Træfɪk can be configured to use service discovery catalog of Consul as a backend configuration:
################################################################
# Consul Catalog configuration backend
################################################################

# Enable Consul Catalog configuration backend
#
# Optional
#
[consulCatalog]

# Consul server endpoint
#
# Required
#
endpoint = "127.0.0.1:8500"

# Default domain used.
#
# Optional
#
domain = "consul.localhost"

# Prefix for Consul catalog tags
#
# Optional
#
prefix = "traefik"
This backend will create routes matching on hostname based on the service name used in consul.
Additional settings can be defined using Consul Catalog tags:
traefik.enable=false: disable this container in Træfɪktraefik.protocol=https: override the defaulthttpprotocoltraefik.backend.weight=10: assign this weight to the containertraefik.backend.circuitbreaker=NetworkErrorRatio() > 0.5traefik.backend.loadbalancer=drr: override the default load balancing modetraefik.backend.maxconn.amount=10: set a maximum number of connections to the backend. Must be used in conjunction with the below label to take effect.traefik.backend.maxconn.extractorfunc=client.ip: set the function to be used against the request to determine what to limit maximum connections to the backend by. Must be used in conjunction with the above label to take effect.traefik.frontend.rule=Host:test.traefik.io: override the default frontend rule (Default:Host:{containerName}.{domain}).traefik.frontend.passHostHeader=true: forward clientHostheader to the backend.traefik.frontend.priority=10: override default frontend prioritytraefik.frontend.entryPoints=http,https: assign this frontend to entry pointshttpandhttps. OverridesdefaultEntryPoints.
Etcd backend
Træfɪk can be configured to use Etcd as a backend configuration:
################################################################
# Etcd configuration backend
################################################################

# Enable Etcd configuration backend
#
# Optional
#
[etcd]

# Etcd server endpoint
#
# Required
#
endpoint = "127.0.0.1:2379"

# Enable watch Etcd changes
#
# Optional
#
watch = true

# Prefix used for KV store.
#
# Optional
#
prefix = "/traefik"

# Override default configuration template. For advanced users :)
#
# Optional
#
# filename = "etcd.tmpl"

# Enable etcd TLS connection
#
# Optional
#
# [etcd.tls]
# ca = "/etc/ssl/ca.crt"
# cert = "/etc/ssl/etcd.crt"
# key = "/etc/ssl/etcd.key"
# insecureskipverify = true
Please refer to the Key Value storage structure section to get documentation on traefik KV structure.
Zookeeper backend
Træfɪk can be configured to use Zookeeper as a backend configuration:
################################################################
# Zookeeper configuration backend
################################################################

# Enable Zookeeperconfiguration backend
#
# Optional
#
[zookeeper]

# Zookeeper server endpoint
#
# Required
#
endpoint = "127.0.0.1:2181"

# Enable watch Zookeeper changes
#
# Optional
#
watch = true

# Prefix used for KV store.
#
# Optional
#
prefix = "traefik"

# Override default configuration template. For advanced users :)
#
# Optional
#
# filename = "zookeeper.tmpl"
Please refer to the Key Value storage structure section to get documentation on traefik KV structure.
BoltDB backend
Træfɪk can be configured to use BoltDB as a backend configuration:
################################################################
# BoltDB configuration backend
################################################################

# Enable BoltDB configuration backend
#
# Optional
#
[boltdb]

# BoltDB file
#
# Required
#
endpoint = "/my.db"

# Enable watch BoltDB changes
#
# Optional
#
watch = true

# Prefix used for KV store.
#
# Optional
#
prefix = "/traefik"

# Override default configuration template. For advanced users :)
#
# Optional
#
# filename = "boltdb.tmpl"
Eureka backend
Træfɪk can be configured to use Eureka as a backend configuration:
################################################################
# Eureka configuration backend
################################################################

# Enable Eureka configuration backend
#
# Optional
#
[eureka]

# Eureka server endpoint.
# endpoint := "http://my.eureka.server/eureka"
#
# Required
#
endpoint = "http://my.eureka.server/eureka"

# Override default configuration time between refresh
#
# Optional
# default 30s
delay = "1m"

# Override default configuration template. For advanced users :)
#
# Optional
#
# filename = "eureka.tmpl"
Please refer to the Key Value storage structure section to get documentation on traefik KV structure.
ECS backend
Træfɪk can be configured to use Amazon ECS as a backend configuration:
################################################################
# ECS configuration backend
################################################################

# Enable ECS configuration backend
#
# Optional
#
[ecs]

# ECS Cluster Name
#
# Optional
# Default: "default"
#
Cluster = "default"

# Enable watch ECS changes
#
# Optional
# Default: true
#
Watch = true

# Polling interval (in seconds)
#
# Optional
# Default: 15
#
RefreshSeconds = 15

# Expose ECS services by default in traefik
#
# Optional
# Default: true
#
ExposedByDefault = false

# Region to use when connecting to AWS
#
# Optional
#
# Region = "us-east-1"

# AccessKeyID to use when connecting to AWS
#
# Optional
#
# AccessKeyID = "abc"

# SecretAccessKey to use when connecting to AWS
#
# Optional
#
# SecretAccessKey = "123"
Labels can be used on task containers to override default behaviour:
traefik.protocol=https: override the defaulthttpprotocoltraefik.weight=10: assign this weight to the containertraefik.enable=false: disable this container in Træfɪktraefik.frontend.rule=Host:test.traefik.io: override the default frontend rule (Default:Host:{containerName}.{domain}).traefik.frontend.passHostHeader=true: forward clientHostheader to the backend.traefik.frontend.priority=10: override default frontend prioritytraefik.frontend.entryPoints=http,https: assign this frontend to entry pointshttpandhttps. OverridesdefaultEntryPoints.
If AccessKeyID/SecretAccessKey is not given credentials will be resolved in the following order:
- From environment variables;
AWS_ACCESS_KEY_ID,AWS_SECRET_ACCESS_KEY, andAWS_SESSION_TOKEN. - Shared credentials, determined by
AWS_PROFILEandAWS_SHARED_CREDENTIALS_FILE, defaults todefaultand~/.aws/credentials. - EC2 instance role or ECS task role
Træfɪk needs the following policy to read ECS information:
{
    "Version": "2012-10-17",
    "Statement": [
        {
            "Sid": "Traefik ECS read access",
            "Effect": "Allow",
            "Action": [
                "ecs:ListTasks",
                "ecs:DescribeTasks",
                "ecs:DescribeContainerInstances",
                "ecs:DescribeTaskDefinition",
                "ec2:DescribeInstances"
            ],
            "Resource": [
                "*"
            ]
        }
    ]
}
Rancher backend
Træfɪk can be configured to use Rancher as a backend configuration:
################################################################
# Rancher configuration backend
################################################################

# Enable Rancher configuration backend
#
# Optional
#
[rancher]

# Default domain used.
# Can be overridden by setting the "traefik.domain" label on an service.
#
# Required
#
domain = "rancher.localhost"

# Enable watch Rancher changes
#
# Optional
# Default: true
#
Watch = true

# Expose Rancher services by default in traefik
#
# Optional
# Default: true
#
ExposedByDefault = false

# Endpoint to use when connecting to Rancher
#
# Optional
# Endpoint = "http://rancherserver.example.com"

# AccessKey to use when connecting to Rancher
#
# Optional
# AccessKey = "XXXXXXXXX"

# SecretKey to use when connecting to Rancher
#
# Optional
# SecretKey = "XXXXXXXXXXX"
If you're deploying traefik as a service within rancher, you can alternatively set these labels on the service to let it only fetch data of its current environment. The settings endpoint, accesskey and secretkey can be omitted then.
io.rancher.container.create_agent=trueio.rancher.container.agent.role=environment
Labels can be used on task containers to override default behaviour:
traefik.protocol=https: override the defaulthttpprotocoltraefik.weight=10: assign this weight to the containertraefik.enable=false: disable this container in Træfɪktraefik.frontend.rule=Host:test.traefik.io: override the default frontend rule (Default:Host:{containerName}.{domain}).traefik.frontend.passHostHeader=true: forward clientHostheader to the backend.traefik.frontend.priority=10: override default frontend prioritytraefik.frontend.entryPoints=http,https: assign this frontend to entry pointshttpandhttps. OverridesdefaultEntryPoints.